配置ARP任意代理示例
本举例介绍ARP任意代理的配置过程。
组网需求
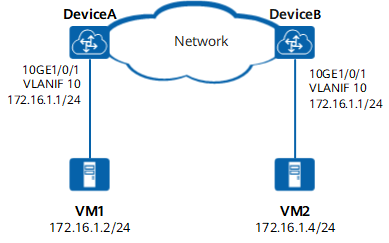
处于同一网段的两个VM,被物理设备隔离成两个不同的物理网络,并且连接VM的网关设备具有相同的网关地址。现需要这两个不同物理网络中处于同一网段的VM能互通。
如图1所示,DeviceA与DeviceB之间路由可达。当不需要DeviceA或DeviceB判断是否存在到对端的路由,并且处于同一子网的其他VM不会向发起请求的VM应答MAC地址时,可以在设备上配置ARP任意代理,使分处在两个子网的用户VM能互通。
配置思路
采用如下的思路配置ARP任意代理:
- 创建VLAN,使得需要互通的VM处于相同的VLAN。
- 配置端口属性,关联端口和VLAN。
- 配置设备接口的IP地址。
- 在设备的VLANIF接口上配置ARP任意代理功能,使得VM发送一个ARP请求(请求目的VM的MAC地址),使能ARP任意代理功能的设备收到这样的请求后,会使用自己的MAC地址作为该ARP请求的回应,以此进行数据转发。
- 在设备的VLANIF接口上配置发布ARP生成的主机路由。
操作步骤
- 创建VLAN

在DeviceA和DeviceB上请配置相同的VLAN ID。
# 配置DeviceA。<HUAWEI> system-view[~HUAWEI] sysname DeviceA
[*HUAWEI] commit
[~DeviceA] vlan 10[*DeviceA-vlan10] commit[~DeviceA-vlan10] quit# 配置DeviceB。<HUAWEI> system-view[~HUAWEI] sysname DeviceB
[*HUAWEI] commit
[~DeviceB] vlan 10[*DeviceB-vlan10] commit[~DeviceB-vlan10] quit - 配置端口属性,关联端口和VLAN
# 配置DeviceA。
[~DeviceA] interface 10ge 1/0/1[~DeviceA-10GE1/0/1] port link-type access[*DeviceA-10GE1/0/1] commit[~DeviceA-10GE1/0/1] quit[~DeviceA] vlan 10[~DeviceA-vlan10] port 10ge 1/0/1[*DeviceA-vlan10] commit[~DeviceA-vlan10] quit# 配置DeviceB。[~DeviceB] interface 10ge 1/0/1[~DeviceB-10GE1/0/1] port link-type access[*DeviceB-10GE1/0/1] commit[~DeviceB-10GE1/0/1] quit[~DeviceB] vlan 10[~DeviceB-vlan10] port 10ge 1/0/1[*DeviceB-vlan10] commit[~DeviceB-vlan10] quit - 配置接口的IP地址
在DeviceA和DeviceB上请配置相同的VLANIF接口地址。
# 配置DeviceA。[~DeviceA] interface vlanif 10[*DeviceA-Vlanif10] ip address 172.16.1.1 24[*DeviceA-Vlanif10] commit[~DeviceA-Vlanif10] quit# 配置DeviceB。[~DeviceB] interface vlanif 10[*DeviceB-Vlanif10] ip address 172.16.1.1 24[*DeviceB-Vlanif10] commit[~DeviceB-Vlanif10] quit - 使能ARP任意代理功能,并发布ARP生成的主机路由
# 配置DeviceA。
[~DeviceA] interface vlanif 10[~DeviceA-Vlanif10] arp proxy anyway enable[*DeviceA-Vlanif10] arp direct-route enable[*DeviceA-Vlanif10] commit[~DeviceA-Vlanif10] quit# 配置DeviceB。[~DeviceB] interface vlanif 10[~DeviceB-Vlanif10] arp proxy anyway enable[*DeviceB-Vlanif10] arp direct-route enable[*DeviceB-Vlanif10] commit[~DeviceB-Vlanif10] quit - 配置VM
# 配置VM1的IP地址为172.16.1.2/24。
# 配置VM2的IP地址为172.16.1.4/24。
- 验证配置结果
# VM1上执行Ping命令,检查VM2的IP地址是否可达。
配置文件
- DeviceA的配置文件
#
sysname DeviceA
#
vlan batch 10
#
interface Vlanif10
 ip address 172.16.1.1 255.255.255.0
 arp proxy anyway enable
 arp direct-route enable
#
interface 10GE1/0/1
 port default vlan 10
#
return
- DeviceB的配置文件
#
sysname DeviceB
#
vlan batch 10
#
interface Vlanif10
 ip address 172.16.1.1 255.255.255.0
 arp proxy anyway enable
 arp direct-route enable
#
interface 10GE1/0/1
 port default vlan 10
#
return