背景介绍
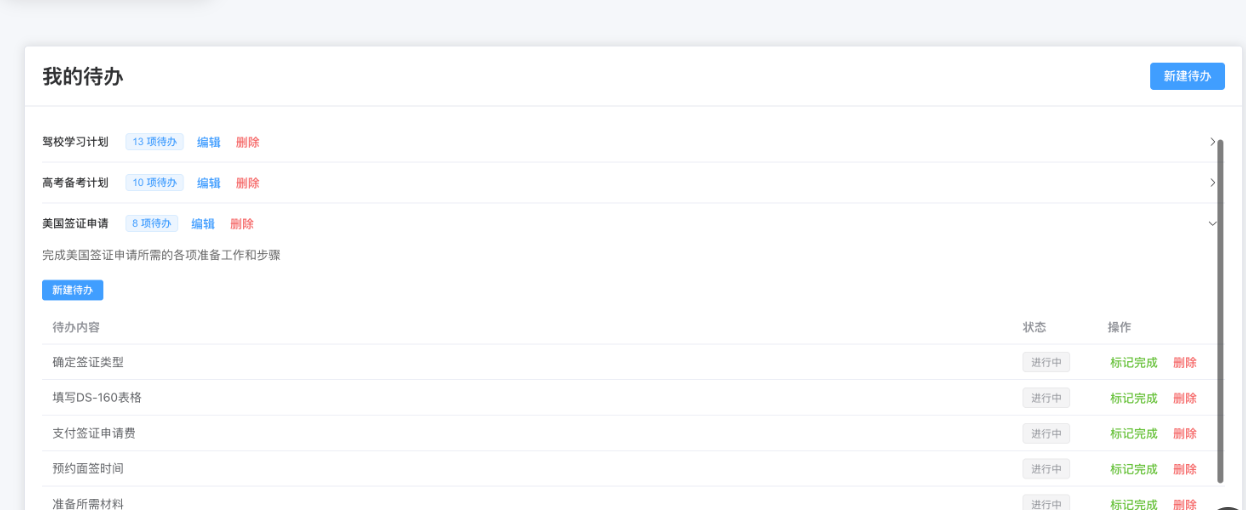
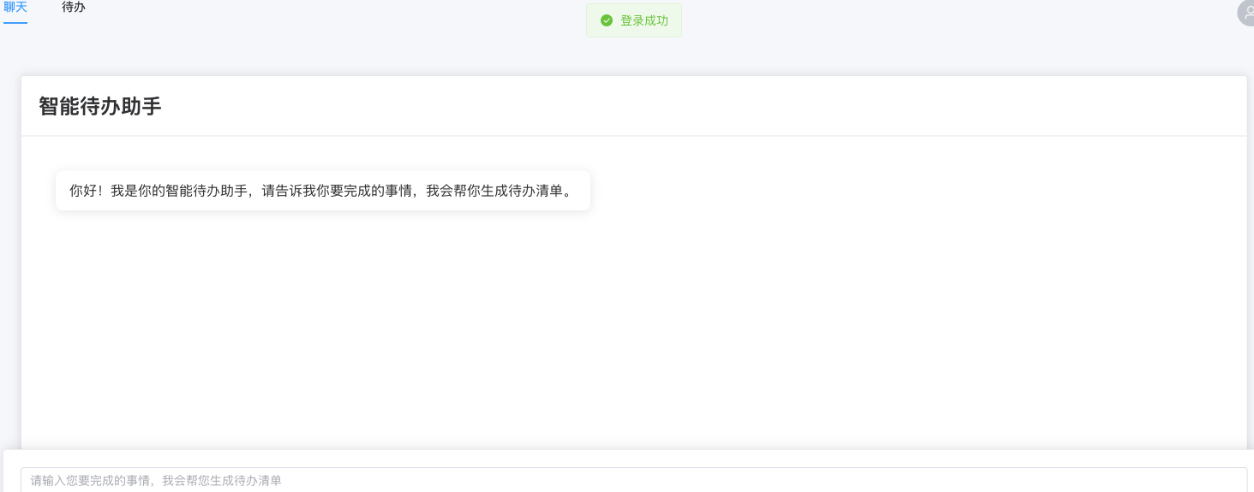
之前使用AI代码工具Trae基于Spring + Vue + MySql生成了一个输入要做事情AI自动生成待办任务列表的的小工具,效果如下:
 本地跑通后正好有一台阿里云服务器和域名,准备把这个项目部署到云服务器实现远程访问,本文记录部署过程。
部署过程
云服务器配置
云服务器使用的是2 核 (vCPU)、2 GiB最基础库,不过跑一个简单服务也错错有余。安装的系统是Ubuntu 24.04 64位。
部署后端服务
安装mysql
后端服务采用了SpringBoot + MySql,首先安装MySql,这里通过 Ubuntu 官方仓库安装。
首先更新系统包列表:sudo apt update
接着安装mysql服务器:sudo apt install mysql-server
接下来启动 MySQL 服务:
sudo systemctl start mysql
sudo systemctl enable mysql # 设置开机自启
最后通过sudo systemctl status mysql查看mysql服务状态。
安装完成后,运行安全脚本加固 MySQL:
sudo mysql_secure_installation
按提示操作:
- 设置 root 密码。
- 移除匿名用户。
- 禁止远程 root 登录。
- 删除测试数据库。
- 刷新权限表。
接下来创建我们项目的数据库:
CREATE DATABASE IF NOT EXISTS autotodo DEFAULT CHARACTER SET utf8mb4 COLLATE utf8mb4_unicode_ci;
构建后端项目
后端项目采用springboot,通过maven构建,在pom.xml统计目录下执行:
mvn clean package -DskipTests
构建完成后会在target路径下生成对应Jar,我们直接运行jar包查看运行结果:
java -var autotodo-server-1.0.0-SNAPSHOT.jar
这样服务就启动起来了。
项目中我们使用了Flyway来进行数据库版本控制。在 Spring Boot 中,Flyway 是一个轻量级的数据库版本控制工具,用于自动化管理和执行数据库迁移脚本(如创建表、修改字段、插入初始化数据等)。它通过跟踪已应用的数据库变更,确保不同环境(开发、测试、生产)的数据库结构一致。以下是 Flyway 的核心概念和在 Spring Boot 中的使用指南。
Flyway 核心机制
迁移脚本 (Migrations)
Flyway 使用 SQL 文件 或 Java 类 定义数据库变更。
脚本命名规则:V<版本号>__<描述>.sql(例如 V1__Create_user_table.sql)。
版本号必须唯一且按顺序递增(如 V1, V2, V3.1)。
元数据表 (flyway_schema_history)
Flyway 自动创建此表,记录已执行的迁移脚本、校验和、执行时间等信息。
每次应用启动时,Flyway 会检查未执行的脚本并自动执行。
迁移类型

Spring Boot 集成 Flyway
- 添加依赖
在pom.xml中引入 Flyway 依赖:
<dependency>
<groupId>org.flywaydb</groupId>
<artifactId>flyway-core</artifactId>
</dependency>
这里项目中由于未指定版本遇到问题改为下面方式:
<dependency>
<groupId>org.flywaydb</groupId>
<artifactId>flyway-core</artifactId>
<version>8.5.13</version>
</dependency>
<dependency>
<groupId>org.flywaydb</groupId>
<artifactId>flyway-mysql</artifactId>
<version>8.5.13</version>
</dependency>
- 配置数据源和 Flyway
在application.properties或application.yml中配置:
# 数据源配置
spring.datasource.url=jdbc:mysql://localhost:3306/mydb
spring.datasource.username=root
spring.datasource.password=123456
# Flyway 配置
spring.flyway.enabled=true
spring.flyway.locations=classpath:db/migration # 脚本存放路径
spring.flyway.baseline-on-migrate=true # 初始化已有数据库
spring.flyway.validate-on-migrate=true # 校验脚本是否被修改
- 创建迁移脚本
在src/main/resources/db/migration目录下创建 SQL 文件:
src/main/resources/
└── db/
└── migration/
├── V1__Create_user_table.sql
└── V2__Add_email_column.sql
这样不需要我们自己创建表,服务启动后就会自动帮我们创建表。
后台运行服务
我们通过java命令直接运行jar的方式会阻塞的控制台,如果控制台关闭,服务就停了,这里使用systemd(系统服务管理)来创建守护进程,支持开机自启、日志监控和自动重启。
systemd特点:
适合长期运行的服务(如 Web 服务器)。
需要 root 权限。
接下来我们创建服务文件:
sudo nano /etc/systemd/system/autotodo.service
接着写入配置:
[Unit]
Description=My Spring Boot Application
After=syslog.target
[Service]
User=root
ExecStart=java -jar /root/code/AutoTodo/server/autotodo-server-1.0.0-SNAPSHOT.jar
Restart=on-failure
Environment=SPRING_PROFILES_ACTIVE=prod
WorkingDirectory=/root/code/AutoTodo/server
[Install]
WantedBy=multi-user.target
最后启用并启动服务:
sudo systemctl daemon-reload
sudo systemctl start autotodo # 启动服务
sudo systemctl enable autotodo # 开机自启
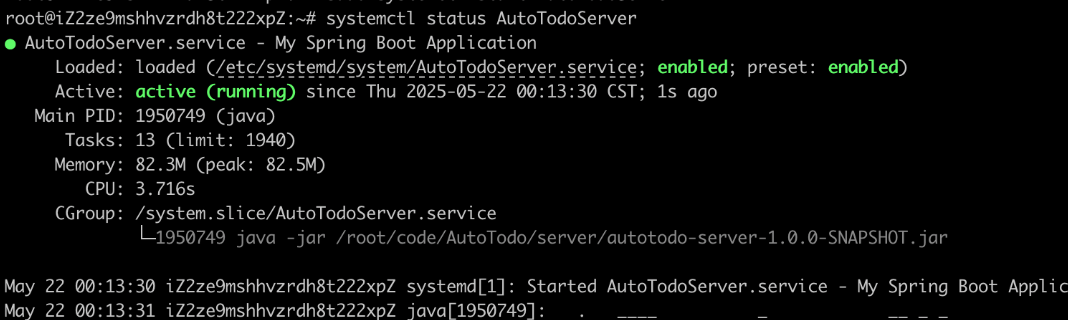
最后可以通过systemctl statue autoto查看服务运行情况:
部署前端项目
安装nginx
前端Vue打包后需要使用静态服务承接请求,这里使用Nginx。
在 Ubuntu 上安装 Nginx 的步骤如下:
1. 更新系统包列表
sudo apt update
2. 安装 Nginx
sudo apt install nginx
3. 验证安装
安装完成后,Nginx 会自动启动。检查服务状态:
sudo systemctl status nginx
正常输出应显示 active (running)。
4. 调整防火墙(可选)
如果启用了 UFW 防火墙,开放 HTTP(80)和 HTTPS(443)端口:
sudo ufw allow 'Nginx Full' # 允许 HTTP 和 HTTPS sudo ufw reload
5. 测试访问
在浏览器中访问服务器的 IP 或域名:
http://your-server-ip
若看到 “Welcome to nginx!” 页面,表示安装成功。
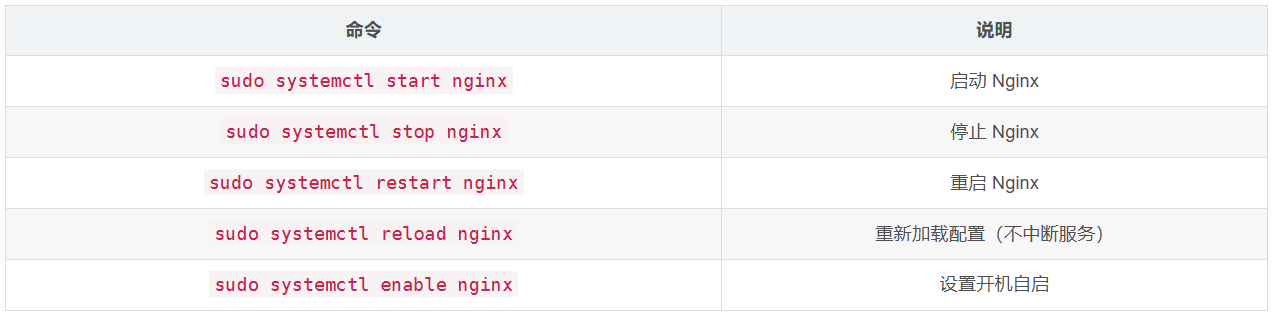
- 管理 Nginx 服务
- 配置文件说明
- 默认配置文件路径:
/etc/nginx/nginx.conf # 全局配置
/etc/nginx/sites-available/* # 虚拟主机配置
/etc/nginx/sites-enabled/* # 已启用的虚拟主机配置(符号链接)
默认静态文件目录:
/var/www/html
8. 基本配置示例
(1) 托管静态网站
创建配置文件 /etc/nginx/sites-available/my-site:
server { listen 80; server_name your-domain.com www.your-domain.com; root /var/www/my-site; index index.html; location / { try_files $uri $uri/ =404; } # 静态资源缓存 location ~* \.(css|js|png|jpg|svg)$ { expires 1y; add_header Cache-Control "public"; } }
启用配置并重载 Nginx:
sudo ln -s /etc/nginx/sites-available/my-site /etc/nginx/sites-enabled/ sudo nginx -t && sudo systemctl reload nginx
(2) 反向代理后端服务
将请求转发到本地的 Spring Boot 应用(假设运行在 8080 端口):
server { listen 80; server_name api.your-domain.com; location / { proxy_pass http://localhost:8080; proxy_set_header Host $host; proxy_set_header X-Real-IP $remote_addr; proxy_set_header X-Forwarded-For $proxy_add_x_forwarded_for; } }
9. 启用 HTTPS(可选)
使用 Let’s Encrypt 免费 SSL 证书:
sudo apt install certbot python3-certbot-nginx sudo certbot --nginx -d your-domain.com -d www.your-domain.com
证书会自动续期,无需手动操作。
构建打包前端项目
可以在项目中直接使用npm run dev来运行前端项目,当时要部署的话需要先构建打包后再部署,通过npm run build来打包构建,打包完成后输出到dist目录。
将打包好路径上传到/var/www/todo下

接下来配置Nginx。
配置nginx服务
在/etc/nginx/sites-available/下创建我们项目的配置文件todo.conf,输入内容如下:
server {
listen 80;
server_name todo.xxx.com;
# 优先匹配静态资源
location ~* \.(js|css|png|jpg|jpeg|gif|ico|svg|woff|woff2|ttf|eot)$ {
root /var/www/todo/frontend/dist;
expires 1y; # 缓存静态资源
add_header Cache-Control "public";
access_log off;
}
# 前端静态文件
location / {
root /var/www/todo/frontend/dist;
index index.html;
try_files $uri $uri/ /index.html;
}
# 后端API代理
location /api {
proxy_pass http://localhost:8080;
proxy_set_header Host $host;
proxy_set_header X-Real-IP $remote_addr;
proxy_set_header X-Forwarded-For $proxy_add_x_forwarded_for;
proxy_set_header X-Forwarded-Proto $scheme;
}
# SSL配置 (需要证书)
# listen 443 ssl;
# ssl_certificate /path/to/cert.pem;
# ssl_certificate_key /path/to/key.pem;
# 性能优化
gzip on;
gzip_types text/plain text/css application/json application/javascript text/xml application/xml application/xml+rss text/javascript;
client_max_body_size 10m;
这里面配置了静态资源服务和后端server api方向代理接口,这样通过域名可以直接访问我们的页面了。
最开始由于少配了下面内容:
# 优先匹配静态资源
location ~* \.(js|css|png|jpg|jpeg|gif|ico|svg|woff|woff2|ttf|eot)$ {
root /var/www/todo/frontend/dist;
expires 1y; # 缓存静态资源
add_header Cache-Control "public";
access_log off;
}
导致打开页面是js文件无法被正确加载。
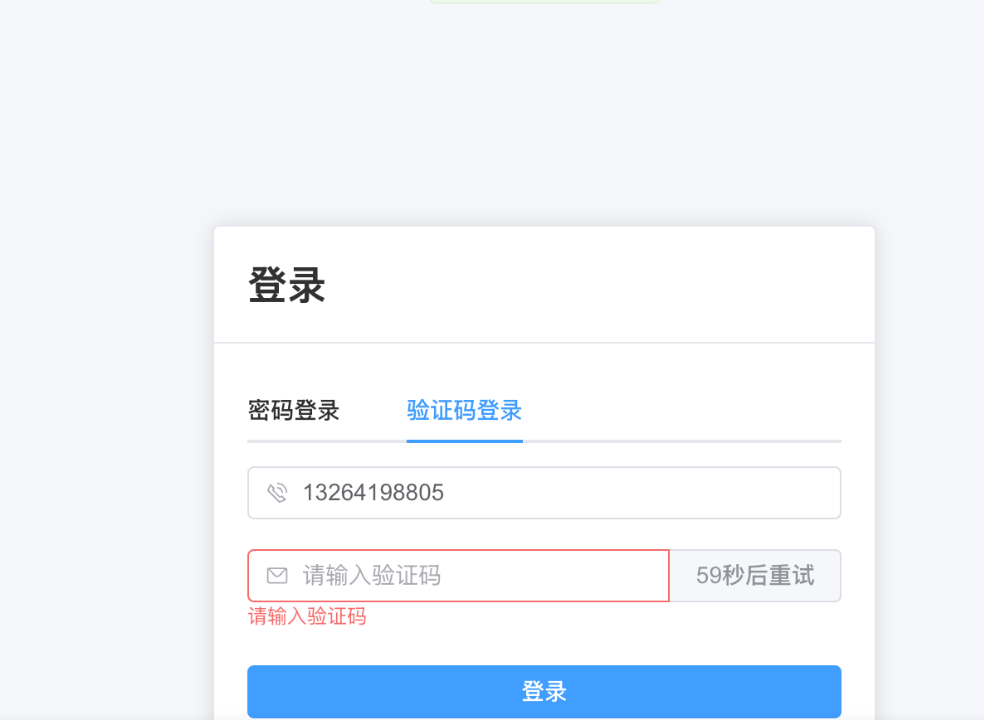
效果展示
最后放几个效果图:
首先登录:
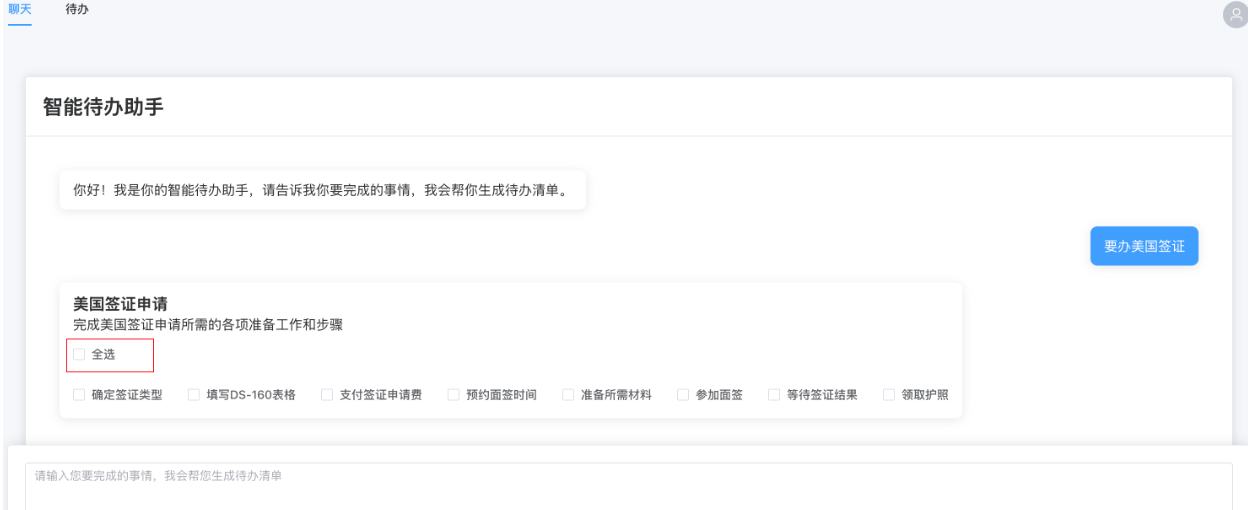
等了完成可以输入我们要完成的事情:
输入内容等待服务端响应,服务端此时调用DeepSeek生成代办项:

生成结果后可以选中代办项进行保存:
保存后跳转到待办列表可以查看我们具体事项对应待办了: